Wildblue.Net Email Settings on Android & iPhone
While setting up an email, it is mandatory to keep a few things in mind to keep the emailing service working effectively. However, users find some queries while setting up Wildblue.Net email settings. If you are one of them, this blog is for you. Here in this blog you will find answers to all your queries and understand the best way to perform Wildblue.Net email server settings. Pay attention while we walk you through this blog as even the slightest error or manual interpretation can cause errors.
Here in this blog, we have shared Wildblue.Net Email Settings for every platform whether it is Android and iPhone. The steps given below will help you in configuring the email settings in the best way possible so you would not face any issues in the future. So, without any further delay, let’s begin understanding how to set up the email system. The Wildblue email server settings require a general incoming mail server and the outgoing mail server. Here are the server settings to begin with.
Incoming Mail Server Settings for Wildblue.Net
To avoid any Wildblue.Net email issues, make sure you follow these incoming email server settings.
| Wildblue.Net Incoming Email Server account type | POP |
| Wildblue.Net Incoming Email Server user name | Your registered Wildblue.Net email address |
| Wildblue.Net Incoming Email Server password | Your registered Wildblue.Net email password |
| Wildblue.Net Incoming Email Server hostname: | pop.gmail.com |
| Wildblue.Net Incoming Email Server Port | 995 |
| Wildblue.Net Incoming Email Server TLS/SSL required | YES |
| Authentication required | YES (Email account Username and Password) |
Even the slightest changes in the above settings can cause issues. Make sure you keep the same. Once you set the incoming server, the incoming service will activate.
Outgoing Mail Server Settings for Wildblue.Net
Another important configuration is of Outgoing mail servers. Make sure you configure the server with the same settings as given below.
| Wildblue.Net Outgoing Email Server account type | SMTP |
| Wildblue.Net Outgoing Email Server user name | Wildblue.Net registered email address |
| Wildblue.Net Outgoing Email Server password | Password of Wildblue.Net email account |
| Wildblue.Net Outgoing Email Server hostname | smtp.gmail.com |
| Wildblue.Net Outgoing Email Server Port | 465 |
| Wildblue.Net Outgoing Email Server TLS/SSL required | YES |
| Authentication required | YES (Email account Username and Password) |
These outgoing email server settings remain the same on all platforms, be it iPhone, or Android. Make sure you don’t make any changes on your own to avoid any email issues.
Now let us see how Wildblue.Net Email Settings change in iPhone and Android in the next section.
Wildblue.Net Email Settings in an iPhone
Want to operate Wildblue.net email on your iPhone? Wildblue.net email settings for the iPhone are not as difficult as it seems. Follow the underlying steps carefully and configure it on your iPhone successfully. In case you find any query or issue while following the steps given below, feel free to contact the email support team and they will answer all your queries instantly.
Follow the mention steps below:-
1- To begin, open the Settings application on your iPhone.
2- Next, scroll down till you find the blue colored email icon “Mail” option as shown in the image below.
3- Next, click on the “Accounts” option and tap on ‘Add Account’.
4- Since the option to all Wildblue.net is not mentioned default, click on the ‘Others’ button from the given list.
5- Next, click on the ‘Add Mail Account’ button.
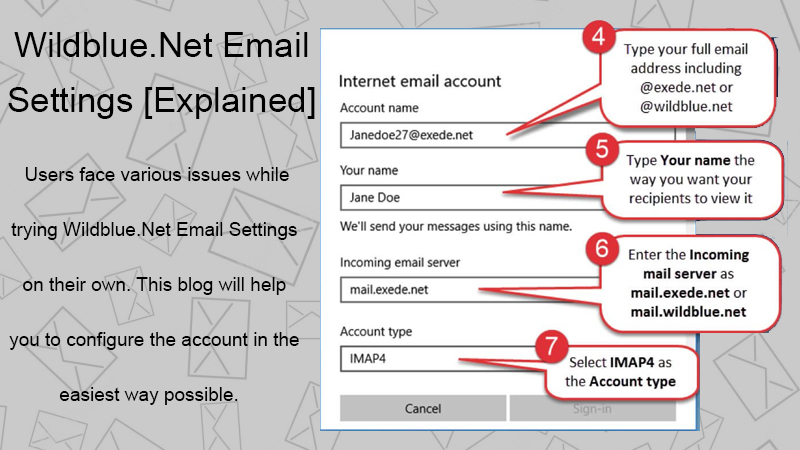
6- On the next screen, users are required to enter essential information like their name, email address of the account, password, and a description (not mandatory) in the respective fields.
7- Then, click on the “Next” button.
8- Next, select the “POP” server and configure your incoming mail server and outgoing mail server according to the settings already given in the article above and click on ‘Next’.
9- Next, you might receive a message to verify the details of the incoming and outgoing servers. In that case, users have to select the “Continue” button, click on “Details” and select ‘Trust to authenticate.
10- Next, click on the “Save” button to save the changes made.
11- Now, select the newly created account and click on the SMTP server and check the details. Make sure the settings are made as given below.
12- Click on the ‘Next’ button
| Outgoing secure (SMTP) port | 465 |
| Security type | SSL/TLS (Accept all certificates) |
| Outgoing secure (SMTP roaming server) port | 587 |
| Security type | SSL/TLS (Accept all certificates) |
| Outgoing (SMTP) port | 25 |
| Security type | None (Accept all certificates). |
| Outgoing insecure (SMTP roaming server) port | 587 |
| Security type | None (Accept all certificates) |
| Authentication | Select the “password” |
Now, you are all set to use Wildblue.net email settings on your iPhone. If you are having an Android device, move to the next section to check the settings for an Android device.
Wildblue.Net Email Settings for Android
Want to operate Wildblue.net email on your Android device? Wildblue.net email settings for the Android device is way simpler. Follow the underlying steps carefully and configure it on your Android phone successfully. In case you find any query or issue while following the steps given below, feel free to contact the email support team and they will answer all your queries instantly.
follow the mention steps below:-
1- Take your android device and find the ‘Mail’ app already installed on your phone
2 – Next, open the app and enter the Wildblue registered email id and password in the respective fields.
3- Next, click on the “Manual setup” option.
4- In the next screen, click on the “POP” server.
5- The POP server settings are given below. Make sure to use the exact settings to avoid any issues while using the email and click on ‘Next’.
| POP server | “pop.gmail.com” |
| Security type | None |
| POP server | 995 |
| Secure port | 993 |
| Security type | SSL/TLS (Accept all certificates) |
| Insecure port | 110 |
| Security type | None (Accept all certificates) |
6- Next, enter the details given below carefully to complete the SMTP settings. Make sure you don’t make any changes in the setting. Then, click on ‘Next’.
| SMTP server | “smtp.gmail.com” |
| Security type | None |
| Outgoing SMTP server | 465 |
| Outgoing secure port (SMTP) | 465 |
| Security type | SSL/TLS (Accept all certificates) |
| Outgoing secure port (SMTP roaming server) | 587 |
| Security type | SSL/TLS (Accept all certificates) |
| Outgoing port (SMTP) | 25 |
| Security type | None (Accept all certificates) |
| Outgoing insecure port (SMTP roaming server) | 587 |
| Security type | None (Accept all certificates) |
7- Click on ‘Done’ on completion to make the changes.
Now, you are all set to use Wildblue.net email settings on your Android phone. If you face any difficulties while setting the email account free feel to connect with the experts.
Conclusion:
The aforementioned information will help you in setting up the Wildblue.net email settings on android and iPhone devices. In case you find any confusion during the process connect with our email support team which is available for you 24*7. You can also, get in touch with us in case you want to know more about the benefits and numerous features it offers. You can connect with our expert team via email, live chat, or give us a quick call on our support number and our team will assist you without letting you wait in long queues.