Outlook Autocomplete Not Working? – Here is Way to Proceed

An email has set its relevance as an irreplaceable mode of communication in today’s world. It has seen multiple big names that have become a phenomenon in the particular service, one such name is Outlook. The widely popular email client is synonymous with emails, such is its popularity. However, great popularity does levy great responsibility. A giant like Outlook is not immune to errors, and one such error is the Outlook Autocomplete Not Working error.
If you’re having trouble with AutoComplete not working in Outlook, this blog is your knight in shining armor.
Related Post:- How to Backup Outlook Emails
What is the Outlook Autocomplete Not Working Error?
In Outlook, autocomplete is a useful function that offers email addresses as soon as you write the initials. However, several users have had issues with Autocomplete not working correctly in Outlook.
This could be the result of a faulty Autocomplete cache, an add-in, or something else entirely. If you are also plagued with a similar issue, we got you covered. Here, we are going to mention multiple techniques using which you’ll be able to resolve the issue.
Related Post:- How to Refresh Outlook
What to Do When Outlook AutoComplete Stopped Working?
There are multiple ways that you can proceed when faced with autocomplete not working correctly in Outlook. Let us provide you with the details of each procedure. Follow the steps carefully, and it is going to resolve the issue in almost every probability.
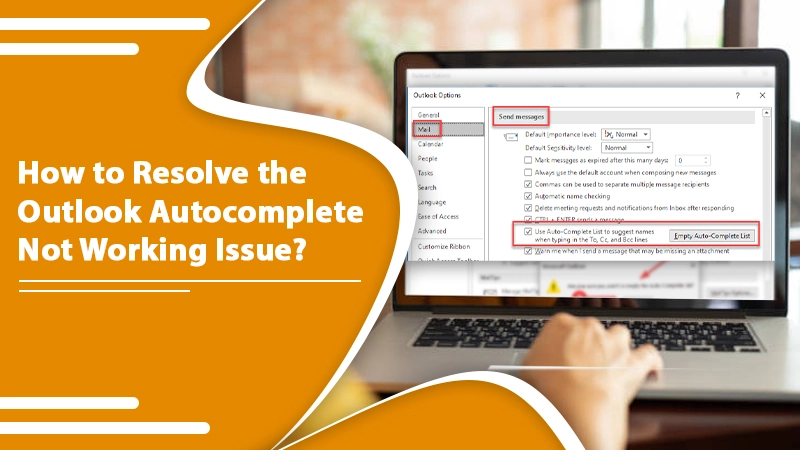
1. Check Whether the Autocomplete Setting is Enabled
This is by default enabled, however it might have got turned off mistakenly. To ensure whether it is enabled, follow these steps:
- Open the Outlook application and then click on File > Options;
- When the Outlook Options wizard opens, look for the Mail tab;
- After this, you need to go to the “Send Messages” option and ensure that the checkbox named Use AutoComplete List to suggest names when typing in the To, Cc, and Bcc lines is enabled. If not, enable it to do the same
- After this, click on the “Ok” button.
If this was the case, then your issue of Outlook Autocomplete Not Working would be resolved. If not, then proceed forward with the blog.
2. Change the Name of the RoamCache Folder
Another method that is worth a shot is renaming the RoamCache folder. However, the catch is that it will reset autocomplete due to which you will lose all saved addresses in the autocomplete list.
Before using this method, make sure that you’re using a Microsoft Exchange Server account or some other one. For that, click on Outlook and go to the File > Info and then click on the Accounts Settings button. In the new dialog window, check if the Type is set to Microsoft Exchange or something else.
- Select the Microsoft Exchange Server account under File > Info > Accounts Settings. Then, find the Change button and click it;
- Now uncheck the Use Cached Exchange Mode checkbox, and in the next step click the More Settings button. After that, press the OK button to close the Outlook program;
- After this, press the Windows + R buttons to open the Run dialog box and enter %LOCALAPPDATA%\Microsoft\Outlook;
- Now in the opened directory, you will find a folder titled RoamCache. Rename this folder as old_RoamCache;
- After that restart Outlook, and enable the Use Cached Exchange Mode checkbox which you disabled previously. Refer to the above steps to do it;
- Restart Outlook again
3. If you use iTunes, Disable the Outlook Change Notifier add-in
The iTunes application installs the Notifier add-in in your system. This might be a reason why Outlook AutoComplete stopped working. Try disabling it using the mentioned steps and then check if the problem still persists. To disable an add-in, do the following –
- Open Outlook and then go to File > Options, after that navigate to the Add-Ins tab;
- Click on the “Go” button which you can find beside the Manage COM add-ins option;
- In the Add-ins dialog window, you have to find the Outlook Change Notifier add-in and then uncheck it;
- Next, click the OK button to confirm your selection and return to the main window.
4. Try Running Outlook In Safe Mode
There is a possibility that another add-in is causing the issue of Outlook Autocomplete not working. To prevent this, run Outlook in safe mode to see if the AutoComplete not working in Outlook issue is resolved or not. Simply press the Windows + R shortcut to start Run, then type outlook.exe/safe in the box, then hit Enter. It will start Outlook in safe mode, with no add-ins installed or functional.
If the autocomplete works in safe mode, there may be a problem with one of the installed add-ins. Using the steps outlined in the above Method, disable all of them. Then restart Outlook to see if the problem has been resolved.
5. Check With A New Account
Sometimes the problem lies with the account itself, and not with the app. To confirm the same, you need to create a new account and check the AutoComplete feature with it. To proceed with this resolution, click on the File > Add Account button, and create a new account.
If the New Account does not face the AutoComplete not working in Outlook issue, then report the problem to the Outlook Support team.
To sum it all up, AutoComplete is a feature that enhances the convenience of the Outlook application by a huge margin. However, it is also true that the Outlook Autocomplete Not Working is frustrating, to say the least. If you’re facing a situation where the Outlook AutoComplete stopped working, go through the solutions mentioned in the current blog. If all else fails, get in touch with the Outlook Support team.