How To Share The Folders In MS Outlook?
The latest version of MS Outlook comes with advanced features and shares many amazing facilities with users to make their work experience better. One such great feature supported by MS Outlook is sharing folders. Yes! If you are using MS Outlook, you can “Share Folders in Outlook” with others.
This helps to perform the team task and makes communication easier for team members. Sharing folders in MS Outlook also gives you the comfort of managing other activities, finances, etc. To learn how you can share folders in MS Outlook, keep reading the guide.
Here, we are going to provide you with easy instructions to do the task without any trouble. Before you proceed next to sharing folders, it is important for you to know that the sharing folder option can be enabled within the organization only. Below we have discussed multiple ways that you can follow to share folders in MS Outlook.
Read Also: How to fix the MS Outlook folders not showing issue on Windows PC?
Share Folders In Outlook 2016 & 2019
1. Without Sending An Invitation
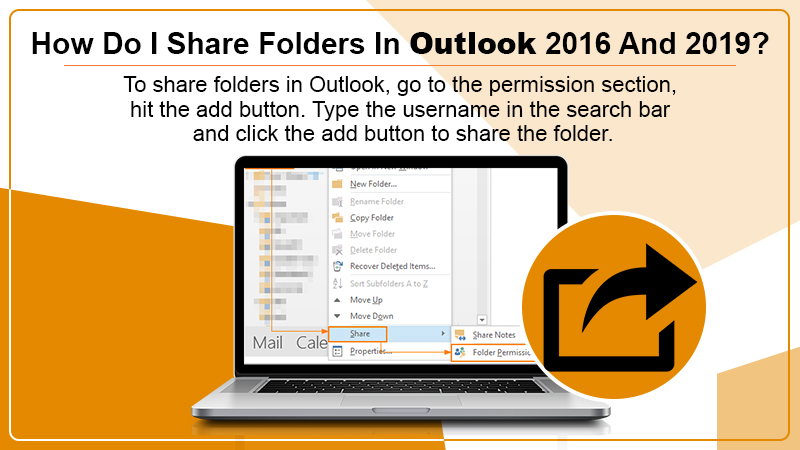
With the help of the steps below, you can share the top-level folders, subfolders, and inbox information with other users without sending an email invitation.
- Select the folder that you would like to share.
- Now right-click on it and go to the properties option.
- Hit the “Add” button from the permission tab; after this, you can ask the user from the address book by selecting it. Hit the “Add” option.
- Go to the “permission” tab and click on “permission level”.
- After this, you can set the permission like- “Read, Write, delete items, and others”.
- Hit the OK button.
- In the next step, you have to make the folders visible to the user from the top container. To provide top container visibility permission to Share folders in Outlook, right-click on the “email address”, and choose the “folder permission” option.
- Add the respective user and make sure that you have clicked the folder visible checkbox.
- If you want to make the parent folder visible, you need to right-click on it and follow the same step for providing the visibility permission.
So, this is how you can share a folder in Outlook without sending an email invitation. To know how to share a folder in Outlook by sending email permission, proceed with the guidelines we have mentioned below.
2. By Sending The Invitation
For sharing the folder in MS Outlook by sending an invitation to the user within the organization, or server, you need to proceed with the step-by-step guidelines we have mentioned below:
- Go to the “MS Outlook” application.
- Click the “calendar” section.
- Now you have to right-click on the calendar you would like to share.
- Hit the “Share” button from the dropdown menu.
- Choose the “share calendar” option.
- Click on the calendar icons and choose the shared calendar option from the top right corner of the screen.
- Open the “To section” of your mail metadata.
- From here, you need to select the address of the user to whom you would like to send a share invitation.
- Select the details that you would like to share and then hit the “send” button.
Important: Make sure that the address to which you would like to send an invitation is under the “Global address list” of your address book.
The invitation will now be sent to the email address of the user and the user will be able to access the folder.
Important: If you would like to modify the permission of your shared folder, you need to right-click on the folder and proceed with the “Share”>>” folder permission” option. From the permission section, you have to select the username for which you would like to modify the permission. Again, go to the permission section and choose the desired option from “permission level” for setting the permission as per your preference. Once you are done with it, hit the OK button.
These simple guidelines will let you learn How to share folders in outlook without sending an email or with an email invitation. Once you have added the user, you can share the folder without any trouble.
Read Also: Outlook Calendar Not Syncing? 11 Techniques To Fix The Issue
Permission Level In Shared Folders In MS Outlook
After you share a folder in Outlook, you can also limit the permission of what people can do within the shared folder. For this, you need to open the MS Outlook, and right-click on the folder you would like to share.
Go to the “permissions” section. Click the “permission level” drop-down list and select the different levels for different users as per your preference. For example; if you set the level as owner, the user can perform anything, but if you set the level as viewers, they can just view and read the details, and do no modification.
So, these are some simple guidelines that will let you share folders in Outlook. If you still have a doubt or trouble, do not hesitate to contact the Outlook support professionals and get a piece of expert advice.