How To Export Contacts From Outlook? (Updated 2022)
There could be a number of reasons why a user may need to export their contacts from outlook. For example; to create an invite list for an event, use the contacts in mail merge, and many more.
Despite the reason, there are a number of ways to export the contact depending on your ease and comfort. If you are struggling to export contacts from outlook, this guide can help you. Here, you will get to learn the different ways of exporting contacts from outlook to other categories.
Also Check, Why: Outlook Notifications Not Working
How to Export Outlook Contacts to CSV File?
MS Outlook comes with a special wizard that helps to export the contacts to CSV simply and faster. With just a few clicks, you can convert the address book into .csv format which can be imported to Google docs, Excel sheets, and other spreadsheet applications. Users can also import their CSV files to MS Outlook and other email applications like Yahoo or Gmail.
Step-by-Step Guidelines to Export Outlook Contacts to CSV
Depending upon the MS Outlook version you are using, follow the steps below:
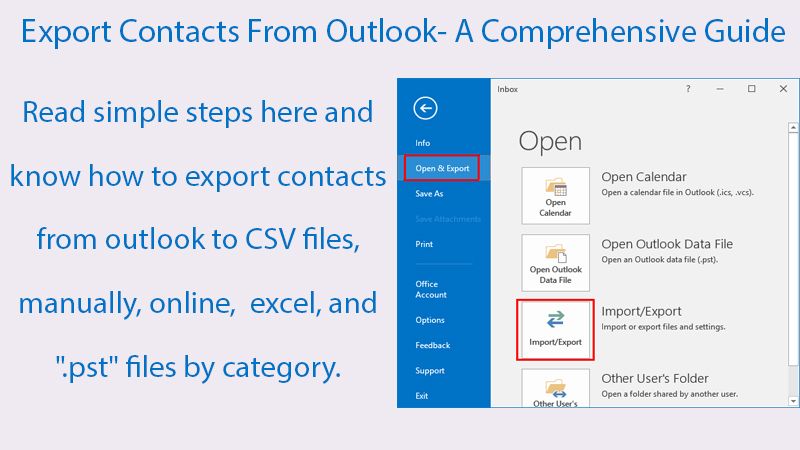
- In MS Outlook 2013, 2016, and 2019 version, click on “File“, after that go to the “Open & Export“>> “Import/Export“.
- If you have MS Outlook 2010, Choose “File”>>”Options”>>”Advanced”>>”Export“.
- The import and export wizard will appear on your screen. Select the “Export To A File” option, and click the “Next” button.
- Choose the “Comma Separated Values” option.
- Hit the “Next” button.
- Choose the “Contacts” folder under the “Target Account” section. If you have multiple accounts, you may need to scroll a little and find one.
- Hit the “Browse” button.
- Choose the name for the “.csv” file and save it to your folder, or you can save it to cloud storage.
- Get back to the “Export a File” window.
- Hit the “Next” button.
- Click the “Finish” button.
- The Map custom field window will appear. To remove the default map, hit the “Clear” map button.
- Find the information on the left panel and export or drag them as per your convenience.
- Once you are done, hit the Ok button.
- Get back to the export file Window, and hit the finish button. Wait until the process gets completed.
Now, all your contact has been transferred successfully. You can open the newly created CSV file and check the details.
Although, this method to export contacts from outlook with a built-in wizard a simple and fast, there are certain drawbacks:
- Allow to export many fields, but not all.
- It takes a lot of time to rearrange and map the fields.
- Contacts cannot be exported by category.
Fortunately, with the next method, you can overcome the problem and export contacts from outlook easily.
Also Check: How to Import Contacts into Outlook
Steps to Export Contacts from Outlook Manually
To manually export contacts from outlook, you need to follow the step-by-step guide mentioned below:
- Click the “People” icon in the navigation bar.
- In the “current view group“, you need to either select a “phone or list” to shift to the table view.
- For exporting more fields showing on the screen, you need to click on the View tab, choose “arrangement group” and hit the “add columns” button.
- In the “Show Columns dialogue box“, choose your desired field and click on the Add button.
- If you want to change the order of columns, you can use the “Move Up or Move Down” button.
- To remove the column you can click on the remove button.
So, with these simple steps, you can export contacts from outlook manually. The above-mentioned guidelines may look lengthy, but when you practice, it will take only a few minutes.
Also Check, Why: Outlook Inbox Not Updating
Steps to Export Outlook Contacts Online
You get a built-in option to export the Outlook contact to.csv file. Here are the steps to follow:
- Sign into “outlook.com” or “outlook on the web” account.
- Click on “People” from the lower-left corner.
- Click on “Manage”>> ” Export Contacts” from the upper right corner.
- Select “export all contacts” or just a “specific folder“.
- Hit the “Export” button.
- Depending upon your web browser version, you can find the “.csv” file downloaded and see a prompt to open it on an excel sheet.
- Once you open the file, you can save it on your cloud storage on the computer.
A user can also export contacts from outlook by categories. This method is useful when the user has different categories for contact like personal, professional, etc.
The contacts can be exported following the two methods as discussed below.
Steps to Export Contacts from Outlook to Excel by Category
- Click the “People” icon in the navigation bar.
- In the “current view group“, you need to either select a phone or list to shift to the table view.
- For exporting more fields showing on the screen, you need to click on the View tab, choose “Arrangement group” and hit the “add columns” button.
- In the “Show Columns dialogue box“, choose your desired field and click on the Add button.
- On the View tab, click on Categories.
- Right-click on the category group name that you would like to export.
- From the “Context” menu, choose the “Copy” option.
- After this, you need to paste the copied contacts to your Excel sheet, or anywhere as per your preference.
Also Check:- How to refresh Outlook
Steps to Export Contacts to the “.PST” File by Category
When a user exports the contact from one computer to another, onto a different Outlook account as a “.pst” file, they can also export the categories. Here are the step-by-step guidelines to do the task.
- On your Outlook account, go to the “File” section, and click on “Open & Export > Import/Export“.
- In the “import and export wizard” first step, select “export a file” and click on the “next” button.
- Choose “Outlook data file (.pst), and click on the “next” button.
- When you see the “export Outlook data file” dialogue box appearing, choose the “contact” folder, and hit the “Filter” button.
- In the “Filter” dialogue box, switch to the “More Choices” option, and choose the “Categories“.
- Choose the category of your preference from the “Colour categories dialogue window” and hit the Ok button.
- Get back to the “Filter” window, and hit the “Ok” button.
- Proceed with the onscreen instructions to complete the task.
Conclusion
We hope that with the help of these simple steps, you would be able to easily export contacts from outlook. The mentioned guidelines are simple and easy to follow. But, if you are still having a hard time exporting the contacts, you should contact outlook support for professional assistance. With professional support, you can easily mitigate the problem and successfully export your contacts from outlook.