Outlook Auto Archive Not Working? Let’s Fix the Problem
Microsoft Outlook is a feature-packed application that brings much convenience to the lives of people. It has numerous great features, one of which is AutoArchive. It reduces mailbox size, minimizes the threat of corruption, and also organizes its contents. That’s why, when users notice their Outlook Auto Archive not working, they can feel a bit annoyed. The feature doesn’t work even when the configuration is correct in many cases. But there’s no need to feel as if you cannot rectify the issue. In this article, you’ll find various effective troubleshooting techniques to make your AutoArchive feature work again.
Related Post:- How To Archive Emails In Outlook
Fixes for Outlook Auto Archive Not Working Issue
You can follow the different methods listed below to make the AutoArchive feature function again. Ensure that you implement all the instructions correctly.
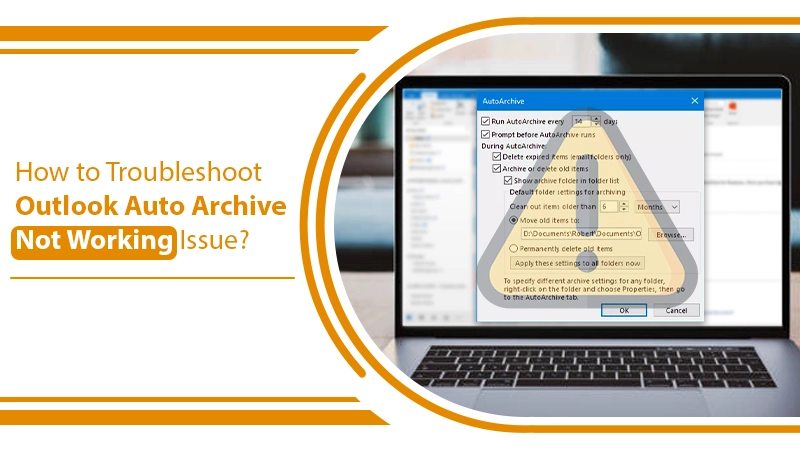
1. Configure the Auto Archive Feature
One of the most effective techniques to use when you notice Auto Archive not working in MS Outlook is to modify its setting. Given below are the stepwise instructions that Outlook 2007 and Outlook 2010/2016/2019/2013 users should follow.
Change Auto Archive Setting in Outlook 2007
- Launch Outlook and sign into it.
- Head over to the ‘Tools‘ menu.
- Choose ‘Options‘ and tap ‘Others.’
- Now click ‘AutoArchive settings‘ and modify it.
Change Auto Archive Setting in Outlook 2013/2010/2016/2019
- Open Outlook on your system.
- Now tap the ‘File‘ option in the dashboard.
- Next, opt for ‘Options.’
- Choose ‘Advanced‘ from the drop-down.
- Here, pick the ‘AutoArchive Settings‘ and modify it.
You must also check that you have the right settings and that you’ve configured the auto-archiving frequency. Also, verify that you’ve chosen ‘Run AutoArchive every day.’
2. Repair the Damaged Outlook Archive PST File
You may notice that your Outlook Auto Archive stopped working if your archive file is corrupt or damaged. So, repair the PST file through the Inbox Repair Tool. It’s a free PST repair tool that Outlook gives. To use the tool, follow these points.
- Open the Inbox Repair Tool. You will find it in the locations below.
-
- C:\Program Files\Microsoft Office\Office1X for 64-bit Windows
- C:\Program Files (x86)\Microsoft Office\Office1X for 64-bit Windows
- And, C:\Program Files\Microsoft Office\Office1X for 64-bit Outlook
- After you run this tool, tap ‘Browse‘ and give the location of the archive file.
- Tap ‘Start’ to begin the scan for errors in archive PST.
- After the scanning ends, tap ‘Repair‘ to start the PST repair procedure.
3. Fix the Archive Command Not Available
Suppose you aren’t able to locate the Archive settings and AutoArchive, and you work in a business environment. In that case, it is possible that they are disabled by your administrator. In such a situation, you can request your mail administrator regarding the corporate policy for archiving. You can ask them about what should be kept and for what duration, and the locations where it can be stored instead.
Another situation when the archive command isn’t available is when you own an Exchange account, and Online Archive is enabled on the Exchange server for you. In this scenario, Outlook will disable the client-side archiving options automatically, and archive as per the corporate policies put up on the Exchange server.
4. Removed from AutoArchive
You will find Auto Archive not working in Outlook if the property is configured to be excluded from this feature. To locate this option, open the item and select ‘File.’ Now choose ‘Properties‘ followed by ‘Option.’ Here, you must set ‘Do not AutoArchive this item.’ Apart from this, you can customize the view to get a summary of all the items the option has been set.
5. Change the location of the Archive Folder to a Local Folder
MS Office doesn’t allow you to link PST files kept on a network share. As a result, you cannot archive a PST file kept on a network share. Essentially, this prohibition on a network share is because of the threat of connection instability. The whole process of archiving entails high disk activity. It implies that the archiving process will not be completed successfully in the instance of minute problems in the network connection.
It also means that the archive PST will get damaged. So, you can change the location of the Outlook Archive folder to a local folder. It will resolve the problems related to the Auto Archive feature not functioning.
6. Inspect the Froup Policy
If you aren’t able to locate the AutoArchive feature in the Archive settings, it may be turned in by your admin under Group Policy. You should connect with your administrator to fix it.
7. Changed Sent/Received Date
Archiving operates as per an item’s modified date. It is how it functions by default. You can view the changed or modified date of a specific item by opening it and choosing ‘File‘ followed by ‘Properties.’ This item will be archived only when its modified date is earlier than the date due for archiving.
Some actions that can result in the modified date change are as follows:
- Reply to all
- Reply
- Move to a different folder
- Forward
- Saving
- Editing
- Importing
There are also instances when the modified date can be changed when the item is scanned by antivirus software or a virus scanner.
8. Change the Received Data on Registry
If the modified date changes because of forward and import operation, you’ll find Outlook Auto Archive not working. So, you must change the received data on the registry. Remember to backup Windows Registry before changing it. Now follow these points.
- Open the Registry in Windows.
- After that, tap the following subkey to edit. HKEY_CURRENT_USER\Software\Microsoft\Office\14.0\Outlook\Preferences – For Outlook 2010 users.
HKEY_CURRENT_USER\Software\Microsoft\Office\15.0\Outlook\Preferences – For Outlook 2013 users.
- Under ‘Edit‘, click ‘New‘ followed by ‘DWORD Value.’
- Now type ‘ArchiveIgnoreLastModifiedTime’ and push ‘Enter.’
- Right-tap on ‘ArchiveIgnoreLastModifiedTime’ and hit ‘Modify.’
- Input 1 in the Value data box. Then press ‘OK.’
- Now exit the Registry Editor and open MS Outlook again. The AutoArchive feature will work correctly now.
Final Thoughts
Hopefully, you understood all the measures to use when you find Outlook Auto Archive not working. Go through the instructions twice so that you take the correct actions. But don’t worry if you get stuck mid-way or feel confused. Instead, seek the help of Outlook support professionals. They will troubleshoot the problem speedily for you.
Written By
John
John is a Technical Writer at Email Support, has 10 years of experience, and is an expert in Email and Cloud Computing. His specialty is writing about the Email clients such as Outlook, Yahoo, Verizon, SBCGlobal, Gmail, Apple Mail, AOL, WildBlue, and others.